How to Set Up Dual Monitors on a Mac – Technologist
Hello coders and programmers! Today’s post is for you!
Are you concerned about having only a single monitor on your Mac because it doesn’t meet your requirements? Do you want to connect another monitor with your Mac to perform complex tasks easily? If yes, then learn the art of setting up dual monitors on a Mac. Now, the question is where to learn that art. Don’t be worried! I am at your service. This comprehensive guide is on how to set up dual monitors on a Mac to help you out. If you are interested in learning to do so, then keep reading.
Let’s get started with learning why you should set up dual monitors on a Mac!
Why Should You Set Up Dual Monitors on a Mac?
Do you know why programmers and coders prefer dual monitors on Mac? If you don’t, then let me tell you something. They usually require spacious screens to perform complex tasks without complexity, which can only be possible if dual monitors are used.
Moreover, setting up dual monitors provides you with an opportunity to boost your productivity by enhancing your focus on certain tasks. The multitasking capabilities of dual monitor set-up allow users to boost their workflow without cluttering tasks.
When setting up dual monitors, users will have additional space in access to set non-focused things on the secondary monitor. It enables them to conduct complex coding tasks and do more to have better outcomes.
Setting up dual monitors will provide you with several benefits, like extending your display and mirroring your screens. In this section, you have learned some potential reasons why you should set up dual monitors on a Mac.
Guide to Setting Up Dual Monitors on a Mac
I have compiled some reasons why you should set up dual monitors on your Mac. If you are concerned about knowing the whole procedure, then keep reading! I have compiled a comprehensive guide on how to set up dual monitors on a Mac to help you out. Here are some simple steps ahead to set up dual monitors on a Mac.
Step 1- Use an HDMI Cable
Firstly, you need to connect your second monitor to your Mac by using an HDMI cable. This cable will make the whole connection robust and efficient. If your Mac doesn’t have an HDMI port, you need to connect the cable with a hub or USB cable. Then, it will be able to be connected to your Mac. Further, your Mac will recognize the second monitor through the connection, and both monitors may flicker a bit.
Step 2- Open Settings
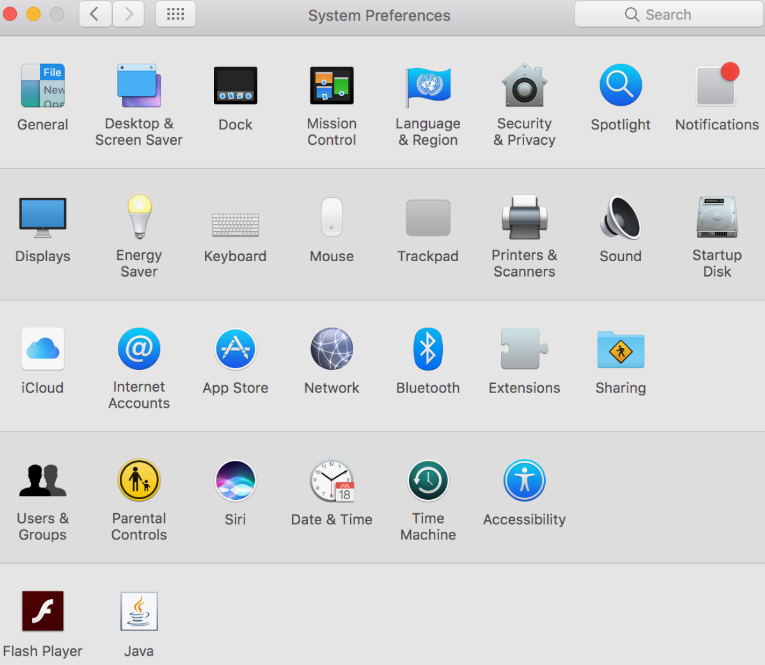
Apple provides users with the convenience of setting things up easily by offering each feature in the settings. Therefore, you need to access Mac settings to set up dual monitors without any difficulty. After accessing the settings, navigate to the system preferences or just click on the Apple logo on the display and choose system preferences. In this way, you will be on a display where you can see multiple setup options.
Step 3- Click on Display
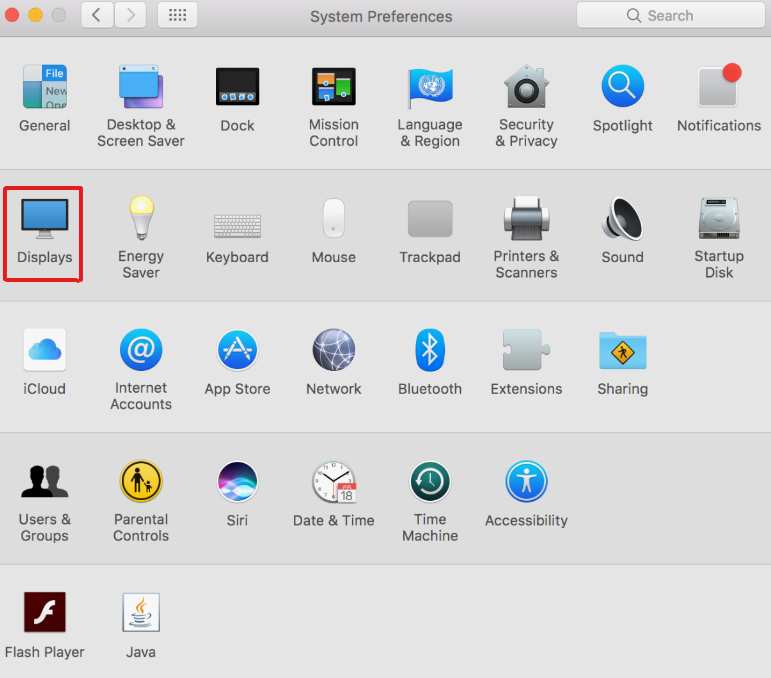
Now, click on the “Displays” option in the system preferences settings to proceed with the procedure. This will take you to another tab where you can customize both your monitors. Further, you can choose the display as your primary or main display of your Mac to help things out evenly.
Step 4- Display Settings
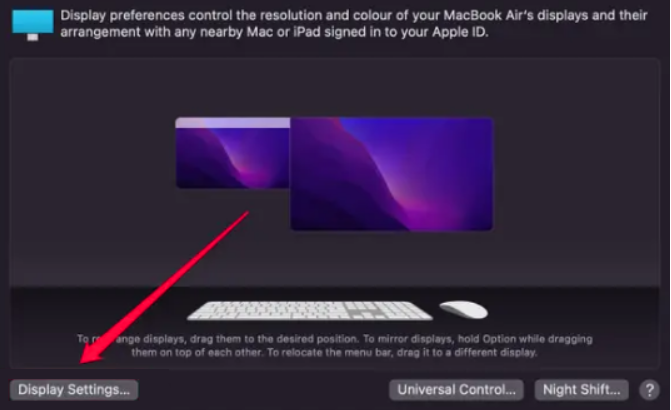
When you open “Display,” you will be able to control displays whether on the right, left, up, or downsides. Now, this will take you on a journey of awarding displays with capabilities like screen mirroring and extended screen.
Step 5- Main display
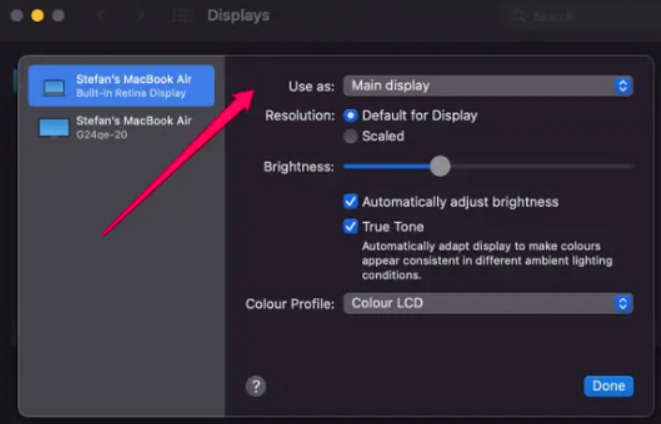
In this step, you will have customization options such as “Use as,” resolution, brightness, and more. Continue the customization of displays by clicking on the Main display to set one monitor as your primary and the other as your secondary. Further, this convenience will not be for everyone, so keep aiming high and manage your tasks effectively.
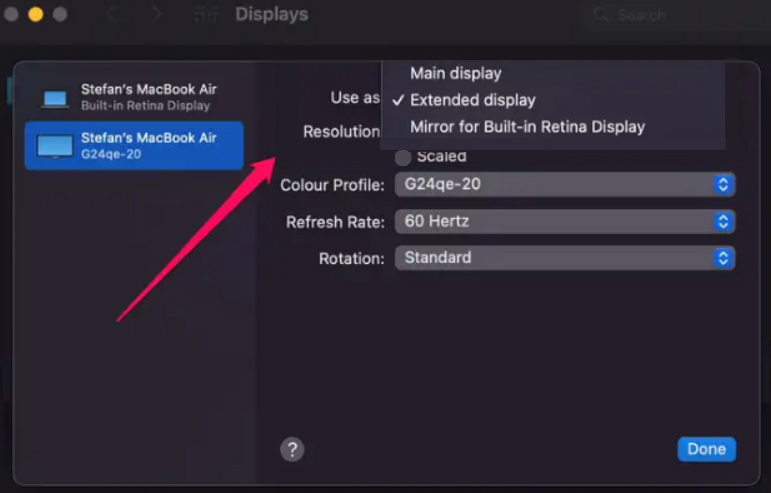
Step 6- Extended display
Finally, you are on the stage of sharing your display with other monitors. When you choose the “Use as” option, you will see three options, such as Main display, Extended display, and Mirror for built-in Retina Display. You should choose the second one as an Extended display to share your display with your Mac.
Setting up dual monitors on any device helps you get enhanced performance and boost focus on certain tasks. Remember, a Mac is also not different. You can divide your display screen into two halves using monitors or split screen mode on your Mac. By doing so, you will get an opportunity to enhance your work performance and productivity to get oriented results. Do you want to know if is this possible? I have compiled a comprehensive guide on how to set up dual monitors on a Mac to your concern.
Q1- Can a Mac support two monitors?
The answer to this question is yes. A Mac has the potential to support two monitors at a single time to provide users with extra space.
Q2- What is the switch command for dual monitor display on a Mac?
The switch command for dual monitor display on a Mac is the “Win+P” press command. It enables users to display dual monitors on their Mac systems.
Q3- How do you split up the Mac screen into two halves?
You can easily split up the Mac screen into halves by just processing two simple steps. Press control+command+F to enter the full screen and choose two applications to open. This will split your screen into halves.
Q4- Can I arrange multiple windows on my Mac?
Yes, you can freely arrange multiple windows on your Mac. This process enhances your productivity and also improves your focus on multitasking effectively.
Q5- Can I open several windows in split screen mode?
The answer to this question is yes. You can easily open several windows in split-screen mode to conduct comprehensive research or process on multitasking.

Benefits of Writing a Business Plan – Technologist

Best Technology Solutions for Remote Work Challenges – Technologist
How to Navigate AI Adoption and the Legal Landscape within the (Re)Insurance Industry in the EU and the UK – Technologist
About The Author
admin
Azeem Rajpoot, the author behind Technolo Gist, is a passionate tech enthusiast with a keen interest in exploring and sharing insights about the rapidly evolving world of technology. With a background in Technologist, Azeem brings a unique perspective to the blog, offering in-depth analyses, reviews, and thought-provoking articles. Committed to making technology accessible to all, Azeem strives to deliver content that not only keeps readers informed about the latest trends but also sparks curiosity and discussions. Follow Azeem on this exciting tech journey to stay updated and inspired.
